1.Nuxt 프로젝트 디렉토리
막 생성된 nuxt 프로젝트의 디렉토리는 아래와 같다. 디렉토리에 대한 정의를 잘 몰라도 이미 Vue.js를 사용했던 개발자라면 비슷한 구조이며 스캐폴딩이 이미 되어있다는 생각이 들것이다.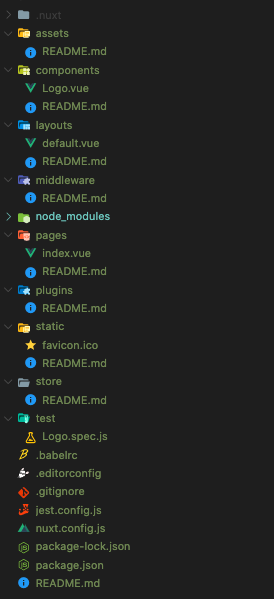
각 디렉토리의 역할에 대해 알아보자.
modules

Nuxt Module은 Nuxt 프레임워크의 핵심 기능을 확장하고 통합 및 추가할 수 있다. 사용자가 직접 모듈을 작성할 수 있으며 Nuxt 커뮤니티에 이미 많은 모듈이 공개되어있다.
The modules Property
모듈은 프레임워크의 핵심 기능을 확장하고 끝없는 통합을 추가할 수 있는 Nuxt.js 확장기능 이다. 모듈을 설치한 후에는 nuxt.config.js 파일의 모듈 속성 아래에 추가할 수 있습니다.
1 | <!-- nuxt.config.js --> |
모듈 개발자들은 보통 추가적으로 사용법에 대한 필요한 단계와 상세내역을 제공한다.
Nuxt.js은 (the node_modules 내부) node require path를 사용해 모듈 배열에 각 아이템을 확인하려고 하고, 그 후 @ 명칭을 사용하면 srcDir 프로젝트로부터 확인할 것입니다.
모듈은 순서대로 실행되기 때문에 순서가 중요합니다.
모듈은 빌드/런타임을 향상시키기 위해 함수로 내보내야(export) 하고, 선택적으로 모듈의 작업이 끝날때까지 promise를 반환해야 합니다. 런타임에 가져오기 때문에 최신 ES6 기능을 사용한다면, 이미 변환(transpiled)되어있어야 합니다.
pages
pages 디렉토리는 어플리케이션의 views와 route를 포함합니다. Nuxt.js는 이 디렉토리 내부에 있는 모든 .vue 파일을 읽으며 자동으로 router 구성을 생성합니다.
또한,
.js와.ts파일을 이용해 route를 생성할 수 있습니다.
모든 페이지 컴포넌트가 Vue 컴포넌트 이지만 가능한 쉽게 universal 어플리케이션의 개발을 할 수 있도록 Nuxt.js는 특별한 속성과 기능을 추가합니다.
1 | <template> |
Dynamic Pages
Dynamic pages can be created when you don’t know the name of the page due to it coming from an API or you don’t want to have to create the same page over and over again. To create a dynamic page you need to add an underscore before the .vue file name or before the the name of the directory, if you want the directory to be dynamic. You can name the file or directory anything you want but you must prefix it with an underscore.
동적 페이지는 API에서 가져온 페이지의 이름을 모르거나 동일한 페이지를 반복해서 만들 필요가 없을때 생성할 수 있습니다. 동적 페이지를 생성하기 위해서 .vue 언더스코어(underscore)를 추가하거나 디렉토리가 동적이길 원한다면 디렉토리의 이름 앞에 언더스코어(underscore)를 추가할 필요가 없습니다. 파일이나 디렉토리에 원하는 이름을 지을수 있지만 이름 뒤에 언더스코어(underscore)를 붙여야합니다.
pages 폴더에 _slug.vue 라는 이름의 파일이 있다면 params.slug을 가진 컨텍스트(context)에서 값에 접근할 수 있다.
1 | <!-- pages/_slug.vue --> |
_book이라는 이름의 폴더에 _slug.vue라는 이름의 파일이 있다면 params.slug와 params.book을 가진 컨텍스트(context)에서 값에 접근할 수 있습니다.
1 | pages/_book/_slug.vue |
Properties
asyncData
asyncData는 컴포넌트가 로딩되기 전에 매번 호출되며 비동기로 인자로써 컨텍스트(context)를 받을 수 있습니다. 반환된 객체는 data object에 병합됩니다.
1 | <!-- pages/index.vue --> |
fetch
Every time you need to get asynchronous data you can use fetch. Fetch is called on server-side when rendering the route, and on client-side when navigating.
비동기 데이터를 가져와야할 필요가 있다면 fetch를 사용할 수 있습니다. server-side에서는 route를 렌더링하기 전에 그리고 client-side에서는 네비게이팅될 때 Fetch가 호출됩니다.
1 | <script> |
head
1 | export default { |
layout
레이아웃 디렉토리에 정의된 레이아웃을 지정합니다.
1 | <!-- pages/index.vue --> |
loading
https://nuxtjs.org/docs/2.x/directory-structure/pages#loading
transition
https://nuxtjs.org/docs/2.x/directory-structure/pages#transition
scrollToTop
https://nuxtjs.org/docs/2.x/directory-structure/pages#scrolltotop
middleware
https://nuxtjs.org/docs/2.x/directory-structure/pages#middleware
plugins

plugins 디렉토리는 Vue.js 어플리케이션의 root에서 인스턴스화되기 전에 실행하려는 JavaScript 플러그인이 포함되어 있습니다. 이 디렉토리는 Vue 플러그인을 추가할수도 있으며 기능 또는 상수를 주입할 수도 있습니다. Vue.use()를 사용할 필요가 있을때마다 plugins/에 파일을 생성하고 nuxt.config.js에 플러그인의 경로를 설정해줘야 합니다.
External Packages
서버와 클라이언트에서 HTTP 요청을 수행하기 위해 외부 패키지/모듈을 사용하고 싶을지도 모릅니다(한가지 큰 예가 axios 입니다).
Install Package
1 | yarn add @nuxtjs/axios |
You can configure for example the axios interceptors to react on possible errors from your API calls across the application. In this example we redirect the user to a custom error page called sorry when we get a 500 status error from our API.
예를 들, 어플리케이션 간에 API 요청에서 가능한 에러에 대응하기 위해 axios interceptors를 구성할 수도 있습니다. 이 예는 API에서 500 상태 에러를 받았을때 사용자를 sorry라고 부르는 커스텀 오류 페이지로 리다이렉트합니다.
1 | plugins/axios.js |
마지막으로, 모듈과 새롭게 생성된 플러그인을 프로젝트 구성에 추가합니다.
1 | nuxt.config.js |
그리고 나서 이 플러그인을 페이지 컴포넌트에 직접 사용할 수 있습니다:
1 | <template> |
모듈을 설치하지 않고 axios를 사용하는 또다른 방법으로는 <script> 태그에 axios를 직접 부르는 것입니다.
1 | <!-- pages/index.vue --> |
만약 “Cannot use import statement outside a module“ 이라는 오류를 봤다면, 웹팩 로더에서 플러그인을 사용가능하도록 하기 위해
nuxt.config.js에build>transpile옵션에서 패키지를 추가해야할지도 모릅니다.
1 | nuxt.config.js |
Vue Plugins
application에서 tooltip을 보여주기 위해 v-tooltip와 같은 Vue 플러그인을 사용하기 원한다면 앱을 런칭하기 전에 플러그인을 설치해야 합니다.
첫번째로 플러그인을 설치합니다.
1 | <!-- install vue plugin --> |
The plugins Property
그리고 나서 nuxt.config.js의 플러그인 키안에 파일 경로를 추가합니다. 플러그인 속성을 사용하면 Vue.js 플러그인을 메인 어플리케이션에 쉽게 추가할 수 있습니다. 메인 어플리케이션이 초기화되기 전에 플러그인 속성에 정의된 모든 경로를 가져옵니다.
1 | <!-- nuxt.config.js --> |
ES6 Plugins
만약 플러그인이 node_modules에 위치해있고 ES6 모듈로 내보내진다면, transpile에서 빌드 옵션에 플러그인을 추가해줘야 합니다.
1 | <!-- nuxt.config.js --> |
자세한 빌드 옵션은 빌드 구성사항 문서를 참고할 수 있습니다.
ES6 Plugins
https://nuxtjs.org/docs/2.x/directory-structure/plugins#es6-plugins
Client or server side only
https://nuxtjs.org/docs/2.x/directory-structure/plugins#client-or-server-side-only